
DIY Wooden Cutting Boards: A Step-by-Step Guide to Crafting Your Own Kitchen Essential
Wood cutting boards add that little something to the kitchen that just can’t be termed solely functional, yet wholly decorative. Be one an avid woodworker or just an amateur curious enough to invest one’s time in such a gratifying project, making one’s very own wooden cutting board will surely satisfy everyone. This will not only let you do the design according to your preference to fit into your kitchen but also turn out super resilient, more than anything store-bought, along with being friendly to the ecosystem. In this step-by-step guide, we take you through all you should know in making a wood cutting board—from choosing the right materials, through to finishing and maintenance of your creation.
Take Your Woodworking to the Next Level! Build 16,000 Woodworking Projects With Step-By-Step Plans
Why You Should Make a Wood Cutting Board Yourself?
1. Personalisation
And it goes on and on—list so big: the type of wood, design, size you want—if one feels like making a cutting board, it can get rustic all the way to farmhouse or as modern as one’s preferred geometric pattern.
2. Cheaper
But by making them yourself instead of buying those commercial cutting boards, you get to save money in return. You can also make a board as good as any store-bought with only a few basic tools and materials but at a fraction of the cost.
3. Sustainability
You will be able to make a very eco-friendly cutting board that supports no waste and responsible woodworking by using reclaimed wood or sustainably sourced materials.
4. Gift Potential
A handmade cutting board is definitely among those few uncommon and at the same time very caring gifts for any relative or a close enough friend of yours. The whole idea is reasonably pragmatic but, at the same time showing the extent of your craftsmanship and attention.
Build 16,000 Woodworking Projects With Step-By-Step Plans
How to Choose an Appropriate Wood for Your Chopping Board
The kind of wood prescribes toughness and generally looks besides safeties. So, what are some good deals one might get himself into:
1. Maple
It is super popular for being hard and having a dense grain pattern, and it is super light in color. This makes the maple resistant to bacterial intrusion too, hence food can be prepared on it safely.
2. Walnut
Walnut has added a dark rich color and is somewhat softer compared to maple. This is great to make spectacular contrasts in multi-wood designs.
3. Cherry
The wood cherry has a warm color and reddish-brown in color—the color which darkens as time passes. It is stable to work at and adds some bit of class to the kitchen.
4. Bamboo
Although technically a grass, it is one of the most renewable and resilient options. Most varieties of wood are softer than bamboo, making it resistant to knife marks.
Woods to Avoid
Softwoods, such as but not limited to pine, scratch more easily and can often contain bacteria. Toxic woods, such as but not limited to cedar, yew, and treated lumber also pose a health risk.
16,000 Woodworking Projects With Step-By-Step Plans
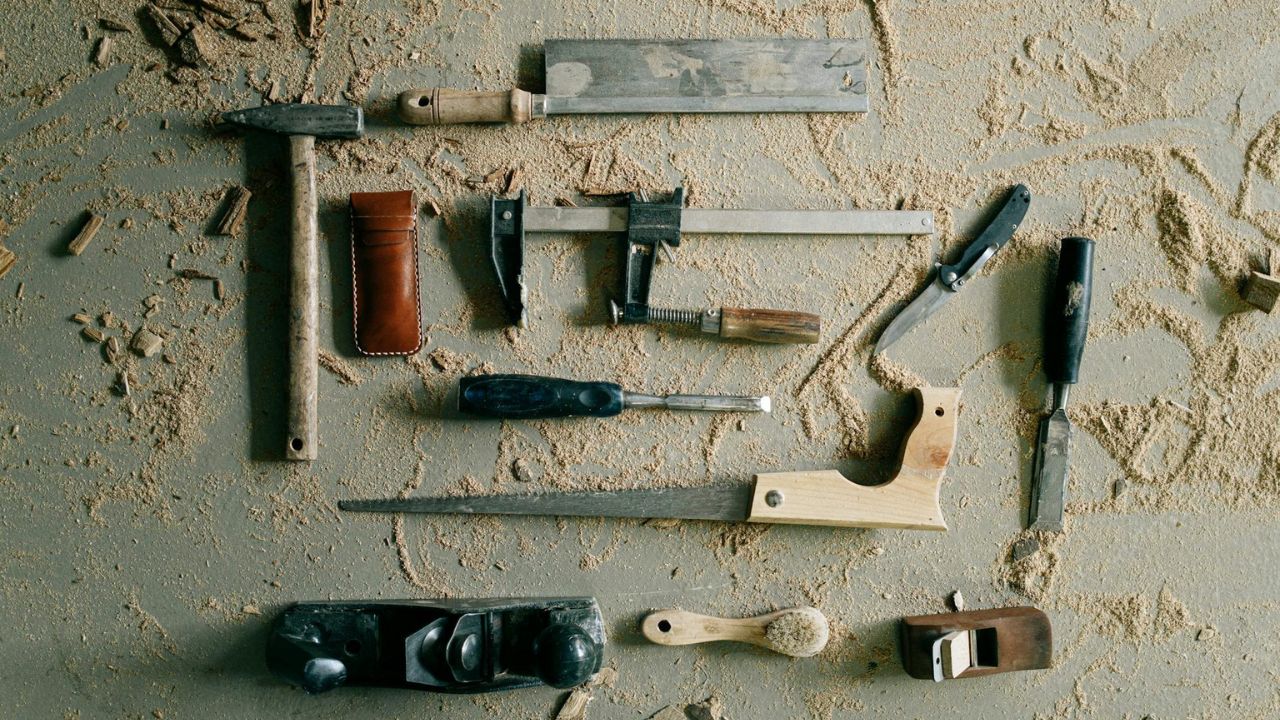
Materials Needed
Following is the list of tools and equipment you’d need to get before starting off with working on the project:
Tools Needed:
- Table saw or Circular saw
- Miter saw
- Router with round over or chamfer bits
- Random orbital sander
- Clamps—bar clamps or pipe clamps
- Drill press or Power drill
- Planer
Material Needed:
- Hardwood boards
- Mineral oil or food-safe beeswax finish
- Sandpaper—80, 120, 220, and 320 grit
How to Build a Wood Cutting Board
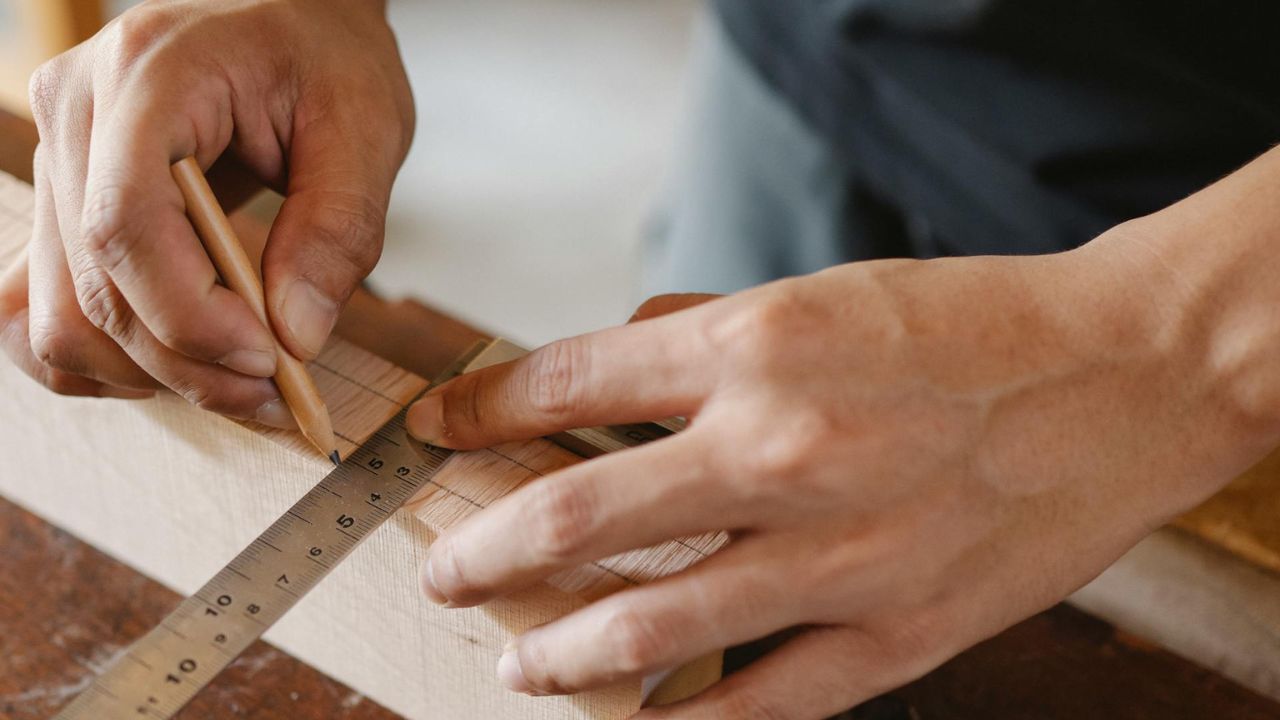
Step 1: Choose and Prepare the Wood
Select your wood, and make sure it is flat with no defects. Now send the boards through a planer if this will be necessary to make them uniform in thickness.
Step 2: Cut and Lay Out the Strips
Cut the wood into strips of all the same width and length, then work out a pattern. Of course, make the run with the grain across all grains so that it does not warp.
Step 3: Glue and Clamp Strips
Mix waterproof glue in between the edges, then clamp together. Flat boards wrapped in tape against warping—even pressure will ensure that won’t happen, right?
Step 4: Trim to Size and Round Board Edges
Have clean cuts using an ideal-sized board with time to dry. Round-over on the router allows for an awfully professional presentation as far as edge profile.
Step 5: Sand Board, Apply Protective Coating
Sand the board, starting from 80-grit going up to 320-grit for a fine finish. Apply mineral oil with food compatibility or a mixture that is beeswax-based as a sealer for your wood to be oiled and not dry.
Take Your Woodworking to the Next Level! Build 16,000 Woodworking Projects With Step-By-Step Plans
Creative Designs for Your Cutting Board
1. End-Grain Patterns
These end-grain cutting boards are solid in their build and a feast for the eyes made of a checkerboard by their end grain facing upwards.
2. Wood Mix Designs
Mix the beauty of contrasts of walnut, maple, and cherry for unique patterns that make your artwork unique.
3. Resin Inlays
Add resin inlays and run wild with creativity, adding some artistic ocean scenery or vivid colorful geometric patterns inside them.
4. Unique Shapes
Add unusual shapes to the usual shapes—like house-shaped, whale-shaped, or even pineapple-shaped cutting boards for a bit more fun.
Build 16,000 Woodworking Projects With Step-By-Step Plans
Care for Your Handmade Wood Cutting Board
Cleaning Instructions
- Wash with warm soapy water after use.
- Never let it soak or go in the dishwasher; this will make it warp and crack.
Conditioning Frequency
- Smear on Mineral oil every 2-4 weeks to keep it oiled.
- A mixture of beeswax to give it that extra protection and finishing touches.
Dont’s
- Acidic, strong, chemical cleaners, and bleach.
- Exposing it to moist conditions or direct sun.
Conclusion / Why You Should Do This Project
Above all, the woodworking project of creating a wooden cutting board is to make something functional, beautiful, and actually quite unique. It might be a simple board only to be used day in and out or an elaborate design that comes out when one has company coming over. Making a wooden cutting board can actually prove to be quite fun and extremely rewarding at the same time.
Take Your Woodworking to the Next Level! Build 16,000 Woodworking Projects With Step-By-Step Plans
Final Thoughts
A cutting board is yet another woodwork invention that finds a great balance between functionality and art. With this in mind, you should get ready to transform this significant utensil into one that features your style, both aesthetically and in craftsmanship. Now, roll up those sleeves and hold tight with that tool; it’s about time to get that wood-cutting board started!
The following support link provides more ideas and materials on the project. It shows different instruments one may want to undertake in woodwork among other materials.
Take Your Woodworking to the Next Level! Build 16,000 Woodworking Projects With Step-By-Step Plans
Can You Make Money Selling Woodworking Projects?
What Woodworking Project is Most Profitable?
How to Make Money Fast with Woodworking?
What is the Highest Paid Woodworker?
Is Woodworking a Good Business to Start
What is the Best Platform to Sell Woodworking Projects?
How to Sell Wooden Items Online?
Woodworking Related Topics And Tags: wooden cutting board DIY, kitchen upgrade, woodworking tips, cutting board designs, handmade kitchenware, eco-friendly projects, custom cutting board, DIY wood projects, kitchen craftsmanship, woodworking tutorial, handmade gifts, sustainable kitchen tools, DIY wood cutting board, woodworking guide, handmade kitchen tools, cutting board designs, woodworking for beginners, sustainable kitchenware